Early on I cultivated the habit of keeping an engineers' bench diary.
It's not a legal requirement for technicians, but when you work on million dollar plant or Intensive Care systems keeping accurate notes can help defuse disputes before they even start. This is where you record observations and comments you wouldn't tell the client.
Individual job sheets should record all the significant points of a job for your own use, even if you don't give your client a copy.
What looks too much when you are writing it often looks too thin when you really need it.
Ross solid state rack amp - blowing fuses.
Date: 8/1/03
The Ross disco rack amp was up on the bench, again. This must be the third time it had come in with a similar complaint, having blown one of the four DC fuses in the two supply rails to the two amps.
Checking the records showed that it wasn't the same fuse each time.
In fact it wasn't even the same amp each time. This prompted thoughts of a metal part loose in the case, but more likely some external cause.
Yet again the amp showed no sign of fault, and replacing the fuse was again all that was required. Each time the fuse had blown with a mighty splat, but using the normal procedure to bring up such dubious amps, no problem was found.
This method is to first check all the output stage transistors for signs of open or shorts with an ohmmeter, and if none are found to fit 150 ohm 20 watt resistor in place of the fuses. I actually keep a couple soldered to 3AG fuse bodies so I can just plug them in (mostly).
If the (unloaded) amplifier biasses its half rail correctly and there are no signs of distress you can risk replacing the resistors with the actual fuses.
This two resistor method will save a new output pair (and fuses) if you have missed a dead driver or pre-driver, however if you find any dead transistor you should test all the other transistors in the direct-coupled section, out of circuit.
Amps don't splat fuses then simply repair themselves again, certainly not three times, anyway.
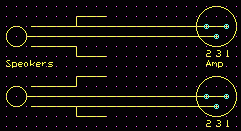
So after a bit of thought I asked him to drop in his speaker leads.
When they finally turned up these consisted of two lengths of red and black figure-8 with a 6.5mm jack plug on one end and an XLR at the other.
And this is what I found;

The jack plugs had metal bodies. What happens in the lower one if the body touches mains ground, such as the body of the other? Yep, it shorts the amp output.
I rewired it like the top one and haven't seen a blown fuse from that quarter since.
Another thing to watch for with XLR's on figure-8 is that they don't clamp the cable. I've had some cases of wires getting twisted together inside the connector body due to over-the-arm cable winding during pack-up.
Peavey PA - mike hum
I had the great pleasure of acting as accompanist to a fine young singer Seri in what was literally a field job at a gathering on a river flat.
Since the big PA was in use that night Angelika had very kindly loaned her small but capable Peavey PA for the gig, a powered vertical mixer and horns over ported direct radiators. But the first stop was the workshop to fit some new 6.5mm plugs after I saw the state of her speaker leads while packing it up. (When I borrow gear it's in my own interest to fix what I can before use, and it's a nice gesture that gets “yes” next time too.)
When we set up everything was fine until anyone touched the microphone, when a loud hum would be induced. Thinking it was a broken mike lead screen I got out my spare and we proceeded without any more trouble.
When I got the lead back to the bench this is what I found;

The dynamic microphone capsule itself looks very much like a small headphone speaker with a mylar diaphragm, and has a similar impedance - about 40 ohms. This is connected to a tiny auto-transformer (meaning it has only a single tapped winding) to transform this up to the standard 600 ohms.
Note that the actual signal circuit isn't connected to ground anywhere.
It took a little while for the penny to drop that the link in the plug into the mike was between its shell and the wrong pin, pin 2, rather than the screen connection, pin 1. The offending link is shown in red.
The idea of this link normally is to extend the shielding to include the metal head-shell of the connector.
Moved to pin 1 the difference was dramatic, as expected. Firstly all the shielding now worked as intended and the induced hum was gone. Secondly the setup was now working correctly in full-balanced mode which also made it quieter.
When I mentioned this to Angelika she said that she had noticed, but simply put it in a stand and avoided touching it. :-)
EIA standard:1 Shield/screen
2 Hot (in-phase)
3 Cold (anti-phase)