http://www.ozvalveamps.org/repairs/laptoprecovery.html | Created: 28/04/07 | Last update:
13:04 5/01/11
<<< OzValveAmps
|
")
6120 Notebook Recovery
This is the story of a full fresh start on a trashed 6120 machine,
and its rebirth as a going stable* Windows 98 Second Edition system.
If you are having problems with one of these machines this page is for you.
* fine print: “stable” must be read in the full context of Windows Operating systems, and is not here intended to mean “stable” in some abstract sense like betting your life on it, as in “that airliner is stable” as you are about to board. “Stable” here is to be read as “that airliner is as stable as its Windows Operating System fly-by-wire”.
6120 Who's Who?
A friend of AVA gave me a rather battered old notebook, nominally a Pioneer 6120, but actually a badge-engineered MiTAC 6120. It turns out that this core MiTAC 6120 machine is surprisingly common, but repackaged and known by a very wide range of unrelated names.
|
Equipment Ident: 6120 a.k.a
|
“Badge Engineering”
|
- 6120N
- MiTAC 6120.00 Notebook
- MiNote 6120
- FlexNote 6120
- HP Compaq nc6120 Notebook PC
- Pioneer 6120
- e@PC 6120
- Synnex 6120
- Fujitsu S6210 notebook, LifeBook B6210 notebook
- Fujitsu Siemens LIFEBOOK S-6210 PC Notebook
- Fujitsu Lifebook n6210
- Fujitsu Lifebook S6210
- MX6210 Notebook
- Compaq Business Notebook nc6210
- Averatec AV6210X60-01 Notebook
- NEC Versa E6210
- ...and you can bet there are more...
It may come with different make of hard drive, in an external package that may look different, may even (apparently) have more limited functions such as no IR port, but the core machine and the firmware and software are in common.
The user manual that came with this one is very carefully generalised and contains no mention of the model number at all. There is no opening gush of “Welcome to the world of your [blah] notebook!”
Note: treat this list with some caution, since it comes from related mentions on the Net it may contain errors, and it is certainly incomplete.
|
“They only thing they engineered was the badge”.
Badge Engineering is the name given to the practice of equipment vendors not getting mixed up in the messy business of actually building any equipment themselves. They buy generic machines from a real manufacture like MiTAC, then stick the badge of their company on it, packaging and marketing it as if they were the original builder.
In this case the actual user base of essentially MiTAC 6120 Notebook computers is much larger than users seem to realise, and that many of their problems have solutions in common.
Despite all the different badges the common processing core should respond to the same software fixes.
|
|
ZDNet / Notebooks / Review
http://www.zdnet.com.au/high-end-notebooks_p4-120106620.htm

High-End Notebooks
By on September 3rd, 2001
 Mitac 6120

Price: AU$4,795, including carry case.
Distributor: Synnex Ph: 03 9538 0000; Fax: 03 9540 0556
www.synnex.com.au

Pioneer 2000 PowerBook III 850

Price: AU$4,499.
Company: Pioneer Computers
Ph: 02 9690 2888, Fax: 02 9690 0333
www.pioneercomputers.com.au
The TestLab had a close look at the 6120 back in the August issue of PC Magazine Australia. Last time, Pioneer Computers and e@PC had each submitted a 6120 notebook and this time around we received one from three distributors. Mitac is actually the manufacturer of the 6120. Pioneer and e@PC have decided to rename the Mitac 6120 notebook and Synnex, on the other hand, has decided to keep the Mitac name. From the outside the three 6120 notebooks looked exactly the same. The Pioneer and e@PC submissions, however, shipped with PIII 850 processors while the Synnex came with a PIII 750. e@PC also did something different from Pioneer and Synnex. They decided to install an IBM hard disk drive instead of a Hitachi hard disk.
|
Initially this one was presented to me set up as two fully set up hard drives, C: 2.5GB with Windows XP installed, (logical) D: 2.5GB empty, and with networking.
It's also the story of my on-line searching for information or help with my 6210, seeing many others with very similar or related problems and getting no-where's fast.
There is an obvious information hole, so here is what I wished someone had collected all-in-one reference place. I hope something here helps someone, somewhere, out there ...
This page covers:
Also - Possible Applications
This page DOESN'T cover:
Backlighting, or anything to do with the display LCD panel.
Disclaimer: This page makes no attempt to cover all aspects of the 6120. It only covers the many problems found at various stages of a one setup, and those that were trouble-free are not covered.
Prologue
I'm an experienced tech, but there are several basic steps to reloading any OS that most of us only do very rarely, if ever, so I will cover this process in concepts and actions in some detail.
I don't do this professionally, but one way and another I've unbogged and de-loused quite a number of machines for friends and associates over the years, and I've never been one to take the “just reinstall Windows” short cut (mainly because I'm dealing with second-hand machines with no system CD's and it's not an option).
Once the machine is initially set up, an OS is then installed. In this case it was W98SE, but it may still be of interest with other OS's such as XP.
With W98 finally running it then has to be set up as a functioning and working environment, first get the plumbing working then move in the furnature - check and install basic and advanced drivers, then some basic applications.
Links get broken, so this page is as much about showing the method of sorting out your own answers as it is about supplying answers.
Background
In this case the original contents of the hard disk drive was well and truly trashed by crashed reinstalls, repartitioning, formatting, interrupting formatting, etc, etc.
Initially, six months ago, XP behaved well and I even had it downloading over WiFi at the local library at 50Mb/sec! But after I did a service job on my sons' computer I started to have problems. The short of it was a polymorphic virus called 09lf.exe.
Expunging this little PoS is a whole other story, but it seems to have damaged some system files before it was finally killed off. This led to progressive dysfunction of XP, particularly freezing during bootup, going a bit further at each attempt, then freezing up or cold boot looping (full reset).
Finally XP became totally unbootable. There were some photos on D: I would have liked to keep, but during recovery attempts someone got a bit carried away and managed to corrupt and lost D:.
Ho hum. With more care it would still have been possible to recover data, so if yours very important, just be very careful, or download via DOS first.
Initial test
My one came with a dead keyboard, dead battery, and some third-party multi-voltage AC powerpack set to 18 volts, not to mention all the gaffer tape around the hinge - a clapped out, studentized, old mutt with the bright new shine of XP in its eye. How could I resist?
rr: ...but it just followed me home!
SWMBO: Hurrumpf.
The question isn't “is it worth getting fixed?” It obviously simply isn't if you are paying, but this is about “being your own expert”, about being in control of your computer rather than its victim - it may have cost five grand new but it ain't worth shite now. However it is still basically functioning as a computer. The question is “how useful could this hardware be (given some TLC)?” {and at this moment he finds his clipboard functions aren't ... hummm; another new options setting on a fresh install - fixed}
Economically; you dump it entirely on anybody who's interested.  But in the short time it worked I found the bridge between net, floppy disk, USB flashdrive and wireless LAN, made it a very useful hub for my other machines lacking USB and etc. It demonstrated its usefulness and was sorely missed when it went down.
It is worth mentioning that somebody with a more seriously dysfunctional machine (e.g. unresponsive HDD) could apply the 6120 in more basic ways, which I'll cover below.
Your First Encounter
Test conditions: no disks in any slot, no connections - except power and external keyboard if desired.
Alternate keyboard - if the built in key board is not functional you will need any keyboard that will plug into the mini-DIN connector next to the power input, right rear. Unlike the older style PC/AT keyboards, if this one happens to mis-boot I've found that simply unplugging it and plugging it back in will bring it up properly.
Expected sequence of operation:
- Power on or hardware reset
- Cold Boot - initial code fetched from firmware on-board BIOS ROM
- Sign on: “Insyde Software MobilePRO BIOS v1.0”
- ...hold for possible user F2 interrupt...
- fetch DOS loader from BIOS designated disks, A:, C:, D:, other?
- load DOS
- run DOS
- chain to Windows
- desktop
How much computer have we got Scotty?
Well it's basically the highly technical method of giving it a burl and watching carefully to see how far it gets.
|
Start Button Note: The machine is started by pressing the start button for about one second. It is forced off by holding this button down for more than about five seconds.
On my machine the button has become lazy and requires a bit of a wiggle. I am quite certain that this is a contact fault in the button itself, it's very common with this style, and they are very common and can be recovered from old equipment like VCR's. The buttons for rarely used functions in those units are practically new.
|
Action: Connect the AC power pack, look for green LED, right hand under screen.
Do, Look and Listen: Press the start button - top left of keyboard until the green LED left under screen lights.
Beep? - Power's good, the CPU is running code, so the core machine is running. (or more than one beep)
- Does some text come up on the display?
- Can you hear the fan running up?
- Can you hear some scratching noises from the hard drive?
- Does lots of text start running up the screen?
- Does a Windows Logo appear?
- Does it appear to (eventually) boot up into some version of Windows desktop, perhaps with lots of warnings and sidetracks along the way?
Does it freeze up at some point and become totally unresponsive? Is it regular, at or near the same place each time?
(
unresponsive:
For some reason most of the Windows systems I've had to deal with have been prone to all sorts of mystery freeze ups and crashes. I variously think of Windows as Bill Gate's Video Game, or Bill's Cruel Joke on Computerdom. It is certainly much less robust than the Operating Systems I have used in the past.
)
|
Tip: If you are really having trouble getting anywhere with booting, try also (and note carefully) Safe mode; failing that, try making a logged startup. If you can get it to boot DOS from a floppy you can access this log file for diagnosis. You should also investigate the boot sequence in the BIOS with F2 at cold boot.
|
Display: Insyde Software MobilePRO BIOS v1.0 - means the CPU is running code out of the BIOS ROM, the core of the machine and the display works!
{If the display doesn't work, try plugging a monitor into the connector on the rear, and good luck, I haven't been that way. Let me know how it goes.}
Display: Memory test 12345678
Unless this does a long count up this is actually only the apparent memory capacity fitted, no testing. This can be changed in the BIOS setup. (see also cleaning memory)
I turned on the full test while I was working on the machine. While this consumes even more boot up time it also interleaves the full RAM test. Leave this on until you are fully satisfied there are no RAM errors at all - none.
If your machine is throwing RAM errors, firstly try giving the RAM connections a good clean.
A second step may be to swap the RAM cards over and see if the fault moves. IF it moves with the cards then you can try obtaining a new card, but if it remains fixed it suggests a fault deeper in the machine, and that it may soon become a Hi-Tech brick. {Sure you can hardware-hack a machine in this state, but you do need oxygen}
A Key Point
<F2> BIOS/CMOS setup/boot interrupt
At this point you should listen for a seek on the floppy, and/or hard drive twitching, and/or the CD drive rushing.
If the A: floppy drive does a seek at boot up it may well be set to be priority boot, A: then C:, in the BIOS, which is handy.
Normally the system will proceed to boot up from the hard drive, loading device drivers and so on.
At worst it will chuck an error message about not being able to find the boot sector or some such, and asking for a boot disk.
If so you need either a bootable CD of some sort, or a bootable recovery floppy, which is what I had, and is more common. But any bootable floppy will do for the moment, and if you have a disk bin full ...
Before you attempt to boot from a floppy or CD you must restart and interrupt at F2, find the boot sequence, note its current setting, and change to first A: then C: boot. This simply means that it will try to boot from the floppy or CD before it goes on to the C: hard drive as normal, and allows us to redirect the boot up.
I happened to find a disk with DOS3.3 on it, and booting that up proves a lot about the system as a whole, and at least gives a keyhole to potentially find and recover files. I made a boot floppy on a W98 system and got something that calls itself DOS7 - seems to work just the same so far.
This will get you to a DOS-based system with the A:\> prompt, being your boot floppy with whatever DOS tools it contains. DOS can be a bit of a shock to the system even if you are returning to it, but command line is daunting to anybody who hasn't seen it before.
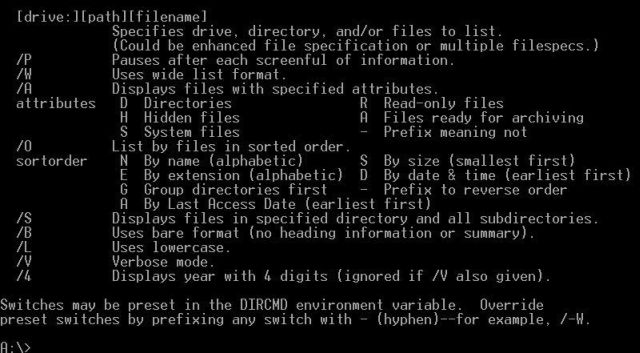
Protip; taming DIR
DIR-ectory is the DOS command used to list the files in a directory/folder.
The problem is, if you simply call for a directory;
C:\>DIR
...you get a list that rushes past to the bottom, and no way of scrolling back. You are now right back in the age of the forward-only printing teletypewiter computer terminal. The first thing you want is for it to /Pause at each screenful, and the second thing is display /Wide to compact the listing on to one screen.
Like many DOS commands if you call it with a /? switch;
driveletter:>DIR /?
...you will get an internal shortform help...
From within a DOS bootup;
driveletter:>DIR *.* /W /ON /P
Translation: show me the DIRectory (folder), wildcard files, Wide display, Ordered by Name, and stop after each Page.
|
filename: the file and directory names must be given in the old DOS 8.3 format, up to 8 characters for the file name, a dot, and three more for its extension or type.
The asterisk “*” is the master wildcard which matches all trailing characters in that section. To see all files requires “*.*”, a wildcard for the name and for the extension.
Less useful is “?” which matches any character in that position.
MSDOS broke a longstanding convention that filenames only contain the characters A-Z and 0-9, no spaces, punctuation or symbols. With the obvious exception of the tilde (~), when creating file or directory names under DOS the wise thing is to limit them to 8 or 8.3 characters, and use only letters and numbers.
|
Changing the default directory/folder.
driveletter:>CD dirname
where dirname is literally as shown, name, tilde~, number, in 8.3 format and is entered literally, e.g. to make My Documents folder the Current Working Directory (say while recovering data files);
driveletter:>CD MY DOCUME~1
C:\>CD MY DOCUME~1
C:\MY DOCUME~1\>_
CD = Change Directory (folder) by name. Folder .. (two dots) is go back up to the parent folder, thus;
driveletter:>CD ..
Will change the current directory up to the parent directory/folder.
|
What's going on?
It's a bit like building a Leggo tower, power (or master reset) gives Cold Boot from ROM - then self test - load and run BIOS - RAM test - BDOS load and run - OS load and run.
It's important to have some idea of what comes in which layer so you have some idea of where to look for an overall failure to proceed.
There is one hell of a lot going on during boot up on one of these systems, but even in more detail the initial part of this startup process is pretty generally a chain of building bricks, like this ...
The first code is fetched from the ROM on the system board. This requires the very minimum of the system to be working correctly. The moment you see the initial BIOS sign-on on the screen you know that an awful lot has already happened to validate the hardware.
At each stage some of the environment is set up and verified, and control passed to a higher layer.
This cold loader loads and starts the Basic Input/Output Operating SystemBIOS which spreads out into the suburbs hooking all the bits back to Central. The manual controls for this layer are offered right at start up as “press F2 to enter BIOS”.
This genenerally flows into an attempt to load a boot sector from a standardised place and from one or more disk drives, depending on the search order settings in the BIOS.
Control is passed to this loader which, in turn, sets up more of the environment, loads COMMAND.COM (MSDOS), and passes control to it, where we start seeing the driveletter:\> command prompt appear in the startup. This will be A:\>C:\> for a hard disk boot.
The system will then generally try to proceed to find, load, and run, some incarnation of Windows.
Recovery
Required:
- Any 3.5 inch floppy disk with any bootable DOS.
- DOS recovery disk - specifically, bootable, containing FDisk and Format
- Windows 98SE install CD (with key code!). To taste.
Handy to have: broadband (or any) Interweb on another computer to Google stuff; LAN.
DOS recovery disk

- ASPIxxxx.SYS - Real-Mode Adaptec CD-ROM driver
- AUTOEXEC.BAT - DOS batch run after Config.Sys is loaded
- BTCDROM.SYS - Mylex/BusLogic CD-ROM driver
- BTDOSM.SYS -
- COMMAND.COM - MSDOS Kernel and Command interpreter (*1)
- CONFIG.SYS - First parameters, defines some DOS settings, and some drivers if required.
- DRVSPACE.BIN - Microsoft DriveSpace compression driver
- EBD.CAB - is a compressed file whose contents are extracted to the Ramdrive during the startup process. The table below identifies the files in the Ebd.cab file.
- Attrib.exe Add or remove file attributes
- Chkdsk.exe A simpler and smaller disk status tool
- Debug.exe Debugging utility
- Edit.com Real-mode emergency text editor (and they do mean emergency)
- Ext.exe New, simple file extract utility (actually called Extract.Exe)
- Format.com Disk format tool (this is the key tool in this Cab)
- Mscdex.exe Microsoft CD-ROM file extension for MS-DOS
- Scandisk.exe Disk status tool
- Scandisk.ini Disk status tool configuration file
- Sys.com Transfers system files and make disk bootable (Format.com also)
- EBD.SYS -
- EXTRACT.EXE - CAB archive unpacker
- FDISK.COM - Makes initial partition(s) of a physical hard drive; defines logical drives within the physical drive - key tool.
- FINDRAMD.EXE - Utility to find the RAMDrive during startup
- FLASHPT.SYS - Mylex/BusLogic CD-ROM driver
- HIMEM.SYS - DOS driver for XMS memory above 1Mb.
- IO.SYS - Input/Output definitions for Command.Com (*1)
- MSDOS.SYS - actual code for MSDOS functions for Command.Com; paths, multiboot, etc (*1)
- OAKCDROM.SYS -
- RAMDRIVE.SYS - driver that sets up and operates a RAM disk in high memory
- README.TXT -
- SETRAMD.BAT - Searches for first available drive to be a Ramdrive
(*1 Note: these three system files are required for a disk to be bootable).
Hardware
Hardware preparation - clean and re-seat RAM and CPU.
Software
Prove wider system by running DOS functions.
This is also where any accessable data can be recovered, hard disk to floppy or serial.
|
Data Recovery: if you really have to recover data from the hard drive then once you can boot the system in DOS, and see files in the root folder of the hard drive (A:\>DIR C:) you are well ahead.
Burning a CD or connecting to a LAN are impractical without Windows, and the only options available are to copy to a floppy, send larger files serially via RS-232. DSZ is a suitable tool for transmitting files in Z-Modem over RS-232 to another computer running it, via a null-modem or crossover cable.
|
I didn't have to recover data, but at this point I dug out CheckIt! which is a useful old tool despite its limitations in more modern machines, and ran memory and hard drive torture test routines. This gave me my first look at a mess of mangled clusters near the middle of the 5Gb drive.
I also had ChkDsk and ScanDisk on the recovery floppy and both of these were throwing errors. {always set the advanced parameters to hardest test for this sort of work - this is the point where you want them to find any errors, now, before we get in deeper and will have to double-back to fix it or have a missing nail in our horseshoe}
Initial attempts tried to repeat the original structure, the hard drive partitioned half-and-half into a C; DOS boot, and D: non-boot, and failed.
Intermezzo: everybody is having rather too much of a good time, and it seems reasonable to one at least to FDisk a single full-size partition (thus obliterating the data on D:), and loose Format on the whole lot.
This threw a big bunch of fixit errors which were then interrupted.
This entire process was repeated under more sober conditions and allowed to run to completion, some considerable time with the snails-pace throught the meteor field. But it was all for nought. So, everything runs okay except the hard drive, and that's mostly harmless ...
{Once before (at least) I had to struggle to stop a 'puter being put out on the nature strip. One quiet afternoon and it went on another ten years as a basic gaming machine, and well flogged too until displaced - running W95 in PWO, when switched off.}
Rebuild
Ground zero - the rebuild starts here.
To start afresh with a Hard Disk DriveHDD you must first set up the Partition Table that defines the logical areas on the physical disk, which of these partitions should be the primary, bootable, and active logical drive (normally the first, C:), and which should be non-DOS.
After the partitions have been defined they then have to be formatted. Again we need to use the most time consuming commands of full surface format.
The first step is to run FDisk on the hard drive.
A:\>FDisk C:
I just followed the defaults (large disk bigger than 512Mb) and instructions.
Initially I cleared all disks and partitions to nothing for a truly fresh start.
Make a partition your desired size (e.g. all or half), BIOS bootable (/System), active others ad lib to your taste/needs.
Swapfiles: Windows uses swapfiles to give apparently limitless memory. This means that when the RAM gets a bit full Windows swaps out to hard drive anything that isn't being used currently to make some room. This makes your system RAM effectively as big as your HDD, but also most of it as slow as your HDD.
Where you have two physical drives, however they are partitioned internally, Windows will run significantly faster if the swapfile is directed to a drive that is not running Windows, i.e Windows running on C:, and the swapfile on physical D:, saving and multitasking head seek time on both drives. My own Scrapheap Challenge desktop machine is set up like that (A Frankenstein cobbled-up box of stuff from bits I've picked up off the nature strip). That does not apply to the 6120 which comes fitted with only a single HDD, in fact it may actually be slower putting the swapfile on logical D: on the same physical drive.
Damaged HDD Workaround
My initial attempts to repeat the 50/50 split still produced errors when formatting the second drive. It looks like a massive head strike where some student bricked it some time, so back into FDisk I tried
- C: 50%, the bootable and active partition
- D: 10%, containing the dud clusters
- E: 40%, non-DOS, inactive.
Once partitioned each partition has to be fully formatted using Format.
Command>Format C: /S {slow, full surface, (C: only - copy /System, make bootable)}
As I expected, drive C: and E: then formatted first time, but repeatedly D: refused to. {ScanDisk has now been run frequently on both of these logical drives and no errors reported, and D: is unformatted and won't log.}
This was in line with my earlier observation when defragmenting the drive and a local streak of dud clusters were showing in the dinky defrag display.
So 500megabytes of D: just sits there, inaccessable, unrecognised, unloved, scorned, ignored. But E:'s up for it!
At this point you should be able to pop your recovery boot floppy disk out, power down (hold start button for 5 or more seconds), start back up, and the machine should now boot of C: into a DOS prompt, and respond to DOS commands.
Now is when you ScanDisk the living daylights out of the drives(s) you have just defined and formatted with all options set to toughest test. I use Checkit! to give the CPU, RAM and HDD an overnight hammering because it allows setting up a long test batch, or you can write a short TEST.BAT loop with ScanDisk.
Until you are really satisfied that your newly defined drives are error free you may need to loop back as I did and define different partitions to work around dead areas.
If your hard drive is really dead or sick they are, I'm told, really cheap and available (and a photo-essay on how to do it may be in my future, but not now).
Even with a dead hard drive the 6120 is still a pretty mean machine around the test workshop, lighting rig, sports event timing, whatever, depending on what floppy or CD gets plugged in.
{No, it looks like booting from a Flash RAMstick is unlikely for W98 at the moment, however there are other OS's such as flavors of *nix, Puppy and other native OS's that already do. However using a DOS floppy boot key to set up a USB RAM stick as a partial-substitute HDD is a real possibility.}
In floppy-only applications an early version of X-Tree provides a tolerable user interface.
Installing Windows
Required: a Windows 98SE install CD, and its related key.
With only a couple of exceptions I went for the default in each selection.
I did go for a stripped down custom version and omitted some system functions, e.g. Express mailer, but otherwise set as for laptop.
Initially this all seemed to go as planned, but after the full install and a full reboot it became apparent that there were a few problems with the basic Windows 98SE setup. Decisions at this point to customise or simply go with the default should make no material difference to a Windows install on a 6120. It should cope with “tick everything”; I just don't like the clutter of stuff I don't use, like the Express Mailer or links to AOL.
After my initial excitement was tempered by a few tests ...;
- The sound wasn't working.
- The display was stuck in childish daub mode, 640 pixels and 16 colours.
- Some programmes simply stopped during installation, the installer either didn't run at all, or unpacked files then vanished.
This was all about missing files. When the hard disk was fully reformatted the original display driver, sound driver, and something called the Microsoft InstallerMSI weren't replaced. The special drivers I can understand, but the lack of MSI looks like some sort of goof. I certainly can't find it or any of its components on the Windows 98SE CD.
Fully applied, enabled everything and let it rip;
UNOFFICIAL Windows98 SE Service Pack 2.1a
sesp21a-en.exe
It was a bit of a trust running this one as it could have contained anything and dropped me right in it, but inspection of the system now shows Knnnnnn patch files installed all over the place.
At this point I had a functional but naked W98SE system, full patched and as up to date as possible.
Soon I will have to confront the problem that all my required applications, including the intended USB driver for W98, are all isolated on a Flash RAMstick. Before I am able to access the RAMstick I had to visit the local library so I could transfer the USB driver itself from RAMstick to floppy as that was all the 6120 could read initially.
This went okay, a USB floppy drive being found in a drawer, and it resulted in a conversation which led to an exchange of e-mails with the head librarian about the needs (duty?) for public libraries to keep pathways open to earlier technologies in the interests of information portablity. We have differing views. I hope this is not going to be applied to Chaucer in the original Middle English.
System Driver Display
Somewhere you are going to go a lot for a while is the Control Panel because that is where Microsoft decided to bury the driver installer, well out of harm's way from dumb users.
I've often suspected that this is a ploy to create an after-market for third-party utilities that maybe do something useful, that provide the neat controls that should have been there in the first place.
Start - Settings - Control Panel
In the Control Panel folder is a token for System.
Double click System folder, open tab Device Manager. You will now see a tree of the machine hardware that can be expanded to show the related drivers.
The two of particular interest here are Display Adaptors and Monitors, both with a little screen icon, which can be expanded and contracted with a single click.
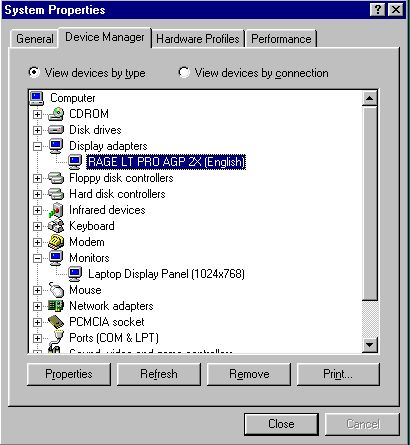
The Monitor driver seems to be on the screen side and is driven by the Display Adaptor on the computer side.
The Properties button will lead to some data about the driver and its status, and deep down the invitation to Update it. Update in turn leads to a Wizard. In this Wizard you are offered the option of finding the required driver yourself (not default). It seems like I always had to, even with net access.
The Browse button allows you to direct its attention to where you have unpacked drivers, or say to the W98 CD folder containing all those compressed .CAB files. The Wizard knows about CAB files and will find its required driver if it's there.
In the case of the display there are a number of drivers supplied including a bunch of generic drivers for various screen situations. Left to itself Windows goes very low-rent VGA when the 6120 is vastly more capable.
After a lot of fairly inconclusive tests I came to manually selecting Laptop Display Panel (1024x768)
For the Display Adaptor we see the RAGE install.
Driver update
Downloaded drivers tend to come in two forms, packed into a Zip file, or as a self-extracting installer such as Setup_prog.exe. If your desired driver comes in a Zip file you're going to need an unzipper.
Okay, so presuming you have located a hopeful driver, and downloaded it in Zip format. I tend to give each of these its own folder in the tree, then un-zip it to its own folder for a look before doing anything with it.
With Windows running you have the option of WinZip, but in DOS-only you will need something like PKUNZIP.
I found a strange little DOS thing called FreeZip v1.4.9 http://freezip.cjb.net
The automated driver update process
Most commonly you get a file called something.exe which is a self-unpacking zip - you don't need to have an unzipper - and these can self-execute and automate the install. Just agree to everything.
The manual driver update process
To manually find a driver on the CD, start Find and ask for files:*.CAB and text within files: drivername.DLL, on your Win repository, in my case the CD as F:\Win98.
This Find will return the name of the Cab that contains your target. Double clicking will open the Cab and allow you to copy/drop the file into the C:\Windows\system folder.
In the Install Wizard you can chose to select a driver yourself, and you can direct the wizard to search on the W98 install disk *.CAB folder, in my case F:\W98.
To manually register a file
To install the newly copied file run;
Run>regsvc32 file2Bregd
These sort of changes generally require that the machine if fully shut down and rebooted to take effect.
Fixing the sound
Google: "PW3041.ZIP"
I found this driver package after getting a clue that the sound system may be a “Crystal”. By recursively searching for the filename I turned up more information and a much smaller driver package (9 megs on dialup is a bit old).
http://download.cnet.com/PW3041-zip/3000-2110_4-165057.html
PW3041.zip 5.12.01.3041
Quick specs
Price: Update
Operating system: Windows 95/98/2000/XP/2003/NT
Date added: May 24, 2000
Total Downloads: 231
Downloads last week: 3
(9.25MB)

From Cirrus Logic: driver package readme info:

This package supports the following driver models:

Crystal SoundFusion(tm)
Crystal SoundFusion(tm) WDM Interface
Crystal SoundFusion(tm) Game Port
I keep feeding the finds back into Google and start to gain a perspective and collect more clues.
Cirrus Logic - PCI Vendor and Device ListsChip Number: CS4280-CM. Chip Description: Crystal Sound Fusion. Notes: http://
www.cirrus.com/en/software/drivers/audio/PW3041.zip ...
http://www.pcidatabase.com/vendor_details.php%3Fid%3D255
“PCI” was looking good. Again, the “PW3041” clue had led me here, so I searched out again on “Cirrus”, “Crystal Sound Fusion” and “CS4280-CM”.
When I found the next site things really started to resolve.
http://sound-drivers.com/companies/263.html - BRILLIANT list!
also good http://www.computerhope.com/drivers/sound.htm
http://www.cirrus.com/en/support/drivers/audio/OS21.html
Crystal Semiconductors CS4280 driver
CS42803D.EXE
When I ran this install the sound system came fully alive. Fixed.
First, you have to work out what question to ask Google.
Fixing the Display
ZDnet review when newly released;
“The 6120 notebook features an 8MB ATI Rage LT Pro graphics accelerator.
”
http://www.zdnet.com.au/high-end-notebooks_p4-120106620.htm
“Device name: RAGE LT PRO AGP 2”X
http://pci-ven.com/revsubsys/PCIVEN/PCIVENfor/PCIVEN-for-MiTAC-6120-59204.html
Google: RAGE LT PRO AGP 2X
“Toshiba RAGE LT PRO AGP 2X”
www.driverfiles.net/.../RAGE-LT-PRO-AGP-2X.../page,sh,15427,221,5,.html
RAGE LT PRO AGP 2X 5.10.2600.6010
RAGE LT PRO AGP 2X

Overall rating: 60%
User reviews:  0

		Downloads:	Total: 3 870 | Last Week: 23
Publisher:	ATI Technologies, Inc. (1285 other programs)
OS Support: 	Windows 98/Me/NT/2000/XP
License:	Freeware
Date added: 	02/28/2002
Last Update:	02/28/2002
Size:

ATI RAGE LT PRO AGP 2X (Korean)

Filename: sens640.zip
Size: 11.6MB
I actually downloaded and used
sp8940.exe (2.1Mb, tolerable on dial-up)
which self expands into folder
RPW9H
containing two sub folders Disk1 and Disk2 containing .DLL's, .INF's etc.
When running the display driver install I simply directed the wizard to subfolder Disk1 and 2 until it was satisfied.
Add/Remove reports it as “ATI mach64 Display Driver”.
It is also reporting an error with one of the three elements of the package, Game Device, Joystick, PCI Audio Accelerator. The Game Device is showing an IRQ conflict
{It is currently playing a music CD, Amazing Stories by the Revelators (Jo Jo Zep and Co), while I am writing this. Tried connecting it to the stereo and the soundcard Line-Out (back left-hand corner with a symbol like a bad hairdo) seems to be seriously lacking bass.} The internal microphone is getting a good earful of the HDD and the CPU fan (not to mention the floppy) as residual noise (using Audacity)}
Fixing the MS Installer - MSI
http://www.dll-error-fixes.com/repair-msidll-error-windows-98/
lists msi files:
msi.dll
msihnd.dll
msiexec.exe
Google: download msi.dll, msihnd.dll, msiexec.exe
...added a couple more we need, now five;
msi.dll msiexec.exe msihnd.dll msimsg.dll msinfo32.dll
These were not on my W98 CD but I found them here;
http://www.rickrogers.org/fixes.html#Installation
Re-running a few previously failed installs now produced proper results.
System Snapshot
Signon says: Insyde Software MobilePRO BIOS v1.0, 1998
Belarc Advisor says BIOS: SystemSoft Version R1.07A 09/20/2000
| Operating System | | System Model |
Windows 98 SE (build 4.10.2222)
System Locale: English (Australian) | | MiTAC 6120 00
Enclosure Type: Notebook |
| Processor a | | Main Circuit Board b |
800 megahertz Intel Pentium III
32 kilobyte primary memory cache
256 kilobyte secondary memory cache
Not hyper-threaded | | Board: MiTAC 6120 R07
Bus Clock: 100 megahertz
BIOS: SystemSoft Version R1.07A 09/20/2000 |
| Drives | | Memory Modules c,d |
5.47 Gigabytes Usable Hard Drive Capacity
5.03 Gigabytes Hard Drive Free Space
PIONEER DVD-RW DVR-K17 [Optical drive]
Generic floppy disk drive (3.5")
HITACHI_DK23BA-60 [Hard drive] (6.01 GB) -- drive 0, s/n 10LW3J, rev 00E4A0A0, SMART Status: Healthy
WLW essentials 4GB [Hard drive] (3.91 GB) -- drive 1, rev 8.07 | | 128 Megabytes Usable Installed Memory |
| | Local Drive Volumes |
| |
| | |
| c: (FAT32 on drive 0) | 3.00 GB | 2.55 GB free |
| e: (FAT32 on drive 0) | 2.47 GB | 2.47 GB free |
|
| | Network Drives |
| | None discovered |
| Users
(mouse over user name for details) | | Printers |
|
| |
|
| Controllers | | Display |
Standard Floppy Disk Controller
Intel 82371AB/EB PCI Bus Master IDE Controller
Primary IDE controller (dual fifo)
Secondary IDE controller (dual fifo)
WinTricks Generic Storage USB Device [Controller]
WinTricks Generic USB Drive [Controller] | | RAGE LT PRO AGP 2X (English) [Display adapter]
Laptop Display Panel (1024x768) [Monitor] |
| Bus Adapters | | Multimedia |
PCMCIA Card Services
Texas Instruments PCI-1225 CardBus Controller (2x)
Intel 82371AB/EB PCI to USB Universal Host Controller | | Crystal SoundFusion(tm) Game Device
Crystal SoundFusion(tm) Joystick
Crystal SoundFusion(tm) PCI Audio Accelerator |
| Virus Protection | | new Group Policies |
| No details available | | None discovered |
| Communications | | Other Devices |
Standard PCMCIA Card Modem
| | |
| IrDA v3.0 Fast Infrared Port |
| Microsoft Virtual Private Networking Adapter |
| | USB Human Interface Device
Standard 101/102-Key or Microsoft Natural Keyboard
HID-compliant mouse
Microsoft PS/2 Port Mouse
Generic USB Hub
USB Root Hub |
Note: the WinTricks USB drivers have since been changed.
Hardware appendix
Required: small Philips head screwdriver, small straight screwdriver; so-called Jeweler's screwdriver sets are ideal.
RAM
Google: mitac 6210 no sound driver
The RAM modules are located under the keyboard. There are two RAM slots which can accommodate two 128MB RAM modules. Onew variant 6120 has 64MB of motherboard mounted memory. The maximum total amount of RAM would then be 320MB.
http://www.zdnet.com.au/high-end-notebooks_p4-120106620.htm
Remove each in turn and clean the edge connector and socket.
Wiggle each as it is replaced to ensure metal-to-metal contact.
CPU
The CPU is accessed by removing the fan plate under the machine.
Unscrewing the four screws that attach the heatsink and fan.
Caution: beware the white heatsink coupling paste/gunk between the heatsink and the CPU; it may be toxic, and it stains like paint. {mine had dried right out to a crusty state}
Caution: carefully note the correct orientation of the CPU in its socket.
Gently lever the CPU up out of its socket using an art knife or small scrwdriver.
With a clean dry brush ensure the pin field and socket holes are all quite clean.
To reassemble, replace the CPU in its socket but towards the front of the machine. Re-mount the heatsink and fan assembly to snug tight, first applying a dab of fresh heatsink compound to the top of the CPU.
The next bit is a bit of a trick; the CPU has to be leavered sideways towards the rear of the machine to plug-it-in to the sideways socket, and held there while the headsink is tightened down to hold it in place. It needs to be firm, but remember the screw threads are embedded in plastic before you get too heavy handed. Better to err on the loose side and have to re-do it, than bust something.
When the CPU is in the correct place the will be about a half to one millimetre gap between it and the socket side projection on the side you a levering.
The acid test for this work is at power up. When you see the Insyde BIOS sign-on message you can be pretty sure the CPU is properly seated.
Keyboard
To remove keyboard; remove the top dress strip containing the start button by releasing catch at the right hand end and sliding the panel left a few millimetres, where it will lift out. Under will be seen the screws that retain the keyboard (missing in my case). Once removed the keyboared lifts up and out, taking care with the flexable PCB connecting underneath.
This connection ribbon runs to a socket on the board below. This socket has a lighter coloured locking collar. This collar has to be gently prised in the unplug direction with a finger nail or art knife to unlock. The ribbon can then be easily removed and reinserted.
Caution: attempting to force and unplug before releasing the lock will result in damage to the cable and/or connector.
My keyboard if full of some gunk, most likely coffee {dark residue} or soft drink {sticky residue}, but it could just be general dust and crud.
Whatever; this has to be the worst keyboard I have ever encountered for disassembly and cleaning. Every single keytop will have to be popped off to gain access to the area that needs cleaning, then all carefully popped back, the right way up in the right place. Since the external keyboard is more ergonomic and is working fine I have been putting this job off.
Cleaning keyboards generally
I'd suggest taking a pic with a phonecam, or at least drawing a mud map of key positions before disassembly. Some of the keys on the top right, Scroll Lock for example, aren't standard or obvious.
The best thing to clean the finger grime off keys is a bucket with a few inches of warm water and dish washing liquid (a regular workshop standby). Don't use metho on finger grime.
With plastic parts generally it is easiest to strip all the electronics and give the lot a jolly good old-fashioned soak with a toothbrush (but NOT transparent windows, they scratch very easily).
You can later work on unwashable remains such as paint using metho later, but resist the temptation to use stronger solvents on plastic case materials - the down side can be sudden and very drastic.
In particular “Essential Oils” such as used in massage are ferocious solvents and even a small spill can produce zombie-like distortions of plastics, strip paint, etc.
The contact layer can be washed in metho both sides, particularly if there are any signs of spilled drink, coffee or soft. All such residue must be totally removed.
The contact mat is a synthetic rubber, and each snap dome contains a small carbon-impregnated pad to make the actual contact. All of these pads must be clean and free of any shards of paper, whiteout, or other foreign material on their faces. The same is true to the carbonised finger pads on the PCB they contact.
After washing in metho the parts of this assembly must be totally dry before reassembly, and can be gently dried in the sun.
Battery pack
The battery pack contains 12 volts worth of 6 amp/hour Li-ion batteries and sundry controllers and temperature sensors.
“The 12.6v 4800mAh Li-Ion battery drove all the 6120 notebooks well over two hours.”
http://www.zdnet.com.au/high-end-notebooks_p4-120106620.htm
In many cases we will already know that the cells in this pack have reached the end of their road and it won't hold charge any more. Battery life is in minutes or even seconds rather than hours. The battery gauge on the end of the battery pack always reports only one flashing bar, dead flat.
A typical on-line price for a replacement (Dec 2010) was $150-170 which simply can't be justified in my case. It may be in yours.
I'm thinking of rebuilding the battery pack as an adaptor to a car electrical system because I have a specific interest in logging data while portable or mobile (and am willing to write my own software to do it).
Example:
Clevo BP600S Replacement Battery - Fits D610, D620, D630

Pioneer BAT-6120 Laptop Battery (11.1V 67Whr Li-Ion 9 cell) by AtBatt.com

SKU: ATB-BP600S (CR# 291203)

Mfr.: AtBatt.com
Our Price: $172.99

11.1 V
6000 mAh
67 Whr
Li-Ion
In Stock

$155.69
http://www.atbatt.com/laptop-batteries/b/pioneer/m/bat-6120.asp
This is purely to provide the technical information and in no way should be taken as an endorsement of this vendor who was chosen at random.
Touchpad
I find the touchpad a bit tiring to use constantly, so I have a wireless (27MHz) USB mouse from Safeway that only cost about $A10, and even adds a roll wheel function.
After the USB driver was installed this mouse installed and worked straight off with no problems at all.
In MicroSoft-speak this is a Human Interface Device, HID.
Addendum 5/1/11: it also eats AAA cells for breakfast. In only a few weeks I've spent more on batteries than it cost. It's nice enough to use but it's getting pensioned off in favor of a battery-less USB mouse.
Disks
Both the 3.5-inch floppy and CD drives worked without any problems.
I added a USB driver since I need to use flash RAM sticks. There are a few generations of this one out there, the one to use being 3.30.
USB Driver
New: 09/12/10
Later experiments with a driver from the desktop machine have produced better, if not perfect, results from the RAMsticks, WiFi adaptors, unloading a cellphonecam.
*** AdvDrvIns.exe (269kb self installer, very self, very quick) - U-Storage Win98 Driver - The associated drivers and INI files are called USTORAGE. sys, .pdr, .inf.
I have found I still need to have the Cruze98 driver installed for the SanDisk Cruzer blade.
*** CRUZER98.ZIP (2.1Mb)- Cruzer-specific; installed alongside WTGENUSB.ZIP without problems and now recognises a SanDisk Cruzer Blade 4GB RAMstick - BUG: but not always!.
This group are the development of a USB driver over time. Note that FE means W98 First Edition, which you should avoid.
FESP230EN-R.EXE (36Mb) for W98First Edition, ignore for W98SE
NUSB23E.EXE (756kb)
nusb320-Eng-98FE.exe (1Mb) for W98First Edition, ignore for W98SE
**
NUSB33E.EXE
(756kb) - my first choice, but skipped due to my MSI installer problems. Later loading and testing suggest that this is indeed the best choice so far. I uninstalled WRGENUSB and CRUZER98 and installed this instead and it now logs both the WLW and Cruzer 4Gb flashdrives (however it still won't recognise the 512Mb stick).
**WTGENUSB.ZIP (11kb) - Win Tricks USB driver This is the one I first selected and installed and it has been handling the USB port with a four-way adaptor, wireless mouse (HID - Human Interface Device in MS-speak), 4GB Flash RAMstick, and WLAN tinkering.
It supports the USB RAM sticks from Safeway, “WLW Essentials”. It does not support my Cruzer Blade 4Gb or my old MAG 512
2:41 PM 23/11/2010

http://www.technical-assistance.co.uk/kb/win98fe-usb-mass-storage-drivers.php

To install the drivers

   1. Download and install the Windows 98 Service Pack (35.5Mb)
   2. Download to your desktop the driver file from the Download section below
   3. Remove ALL drivers for USB flash drives in Device Manager
   4. Remove ALL drivers for any USB 2.0 controllers (many have an uninstall option)
   5. Remove ALL unknown devices from Device Manager
   6. Run the exe file you downloaded, and follow the instructions, rebooting after installation
   7. When the computer boots up again, it may detect new USB 2.0 controllers, in which case you may need to reboot again

http://www.technical-assistance.co.uk/drivers/nusb320-Eng-98FE.exe

http://www.wintricks.it/faq/usbpen98_6.html


Windows 98SE driver for non-U3 USB flash drives
http://kb.sandisk.com/app/answers/detail/a_id/160


STEP 1 - Download the Windows 98 SE drivers from the SanDisk website
Click on your product:
1. Cruzer Micro (non-U3 devices)
    Cruzer Mini (non-U3 devices)
    Cruzer Titanium (non-U3 devices)
    Cruzer (non-U3 devices)
2. Download Winzip if necessary
3. Unzip the drivers to a selected location in the PC

STEP 2 - Run the setup.exe file
1. Unplug the USB flash drive from the PC.
2. Run the Setup.exe file.
3. Follow the setup instructions.

STEP 3 - Plug in the USB drive
1. If the drive is not detected, right-click My Computer.
2. Select Manage[*].
3. Under Computer Management, click Device Manager.
4. Click the + symbol next to Disk drives.
5. Right-click the USB drives and select Update Driver.
6. Click Yes, this time only.
7. Click Next.
8. Click Install the software automatically (Recommended) then Next.
9. Click Finish.
|
Notes:
* this should read “System”
35Mb is fine for broadband but not really practical on dialup.
“Non-U3” hasn't been explored, but seems significant.
Input/Output connections
Earlier, several printers had been tested using this machine and showed it was quite adept at producing good results driving anything from a wide track dot matrix to an office laser printer.
A major file transfer (200Mb) had been done serially using an RS-232 machine-to-machine null modem cable, and Telix Z-modem transfer. DSZ worked too and is very powerful, but not as obvious in use.
Sometimes it arises that the least fuss method of getting a bunch of files from one machine on to another is overnight via the serial port and null-modem cable.
Possible applications
'doze
My machine has a sticker on the top that says “Designed for Windows 98”, so reloading W98 is the most obvious thing to do.
Even an old OS like W98 still does what it did, and if you can get it up an running, even with a seriously pruned, or no, hard drive, you can still play CD's to your stereo with it, perhaps a Google box connected to the net
Apart from the many ports and connections already on the machine, mine came with a network adaptor and could no doubt function as a “thin client” off a LAN.
Your machine however may have some problem, such as a totally unresponsive hard drive, that makes the obvious option either difficult or impossible.
In that case the machine may still prove useful in another role, say as a logger or controller.
DOS-based machine
Even if the hard drive is unavailable there is still a lot of useful machine left. With the floppy drive alone many smaller fixed applications are possible, and if custom CD's can be burned with the support of another machine a very large (read/run-only) software library could be available to an application.
Logger/controller
I've built a number of data logging functions using redundant and cast-off hardware. These projects evolved into a scheme I call FlopLog.
FlopLog has a couple of optional forms, but the idea is a floppy disk (or other media) that comes all-found with all the software it needs to do its task including boot up, and has very minimal expectations of the host machine.
The floppy boots and takes command of setting up a large RAMdisk in memory, unZipping compressed files onto the RAMdisk, and setting up the environment before starting the actually data logger application (in this case an application written in QBasic, but could be just about anything). The DOS recovery disk does something very similar.
DOS itself provides some very primitive serial functions, as does QBasic, but the outstanding CP/M and DOS communications package is CrossTalk-16 a.k.a. Xtalk16, followed by Telix, with Procom getting a mention. There is also a shell Unattended File Transfers UFT2.ZIP that automates DSZ as a hands-off file exchange system.
For modem handling and freedom from “comms hangup” CrossTalk is outstanding, but it's more of a comms scripting language than a comms package and has a steeper learning curve, but as such it is very powerful and capable, if not easy.
Telix is a bit large but it also has a scripting language and even a compiled version, so a stripped-down resident communicator is possible. It also comes with a very basic BBS script that could be adapted to dial up download.
Procom is a bit like a mini Telix, a mini-Me - easy but limited.
My own inclination would be for a UFT/DSZ setup.
Controller - Lighting
One of those back-burner projects is an automated lighting controller for small bands and performances.
6120 Specifications
|
Processor
|
- Intel Pentium III / Celeron Processor
|
|
Core Logic
|
|
|
Memory
|
- 128/256KB L2 cache (Depending on CPU configuration)
- 0MB SRAM on board, expandable to 256MB
- 2 x 144-pin DIMM sockets (16/32/64/128MB SDRAM DIMMs)
- 256KB Flash EPROM
Note: 6120 and 6120L 2 x SDRAM SO-DIMM 288 (128+128+32)
An SO-DIMM is an industry standard 144 pin 3.3V Dual-Inline Memory Module.
http://www.microflextech.com/products/notebook/mitac/6120.htm
|
|
Video/Display
|
- 8MB SGRAM video memory
- 14.1"/13.3o XGA TFT, 12.1o SVGA TFT / HPA
- 1024 x 768 resolution, 16M colors for CRT
- Hardware 3D graphics engine and MPEG II (DVD) ready
- Simultaneous output to TV, CRT, and LCD
- Supports 2X AGP Bus
|
|
Storage System
|
- 3GB/4GB/6GB/9GB/12GB Ultra-DMA HDD
- 24X CD_ROM drive and 6x DVD-ROM drive
- 3.5" 1.44MB/1.2MB/720KB FDD
- 9-cell NiMH battery pack
- 100-240V / 50-60Hz auto switching AC adaptor
|
|
Power Management
|
- APM 1.2 / ACPI compliant
- Standby / Suspend to Disk/DRAM power saving mode
|
|
Audio System
|
- PCI 3D audio support
- MS-sound compatable
- Software wavetable synthesizer
- 3D VBX stereo audio technology
- Built-in dual stereo speakers (1W) and mono microphone
- Audio volume control (rotary type)
|
|
Keyboard/Pointing Device
|
- MS-Windows 98 keybard, 19mm spacing
- Windows logo key x 1 Touchpad with two mouse buttons
- Application key x 1
- Integrated hot keys for LCD brightness control and enter Suspend Mode
|
|
I/O Ports
|
- Two type II or one type III PC Card slots, VZ/Cardbus support
- One EPP/ECP compliant bi-directional parallel port
- One external VGA port
- One PS/2 keyboard/mouse port
- One USB port
- One FIR port, ASK and IrDA compliant (4Mbps and 115Kbps)
- One DC-IN jack for AC adapter
- One audio-out jack (stereo)
- One mic-in jack (mono)
- One S-Video port
- One port replicator port
- One RJ-11 port for fax/modem (optional)
|
|
OS
|
- Windows 95/98 and Windows NT 4.0 compliant
- Designed for Microsoft Windows 98
|
|
Weight and Dimensions
|
- 3.2 kg (7.05 lbs) with 14.1" LCD, battery, FDD HDD, CD-ROM
- 310mm(W) x 258mm(D) x 39.5mm(H) - with 14.1" LCD panel
|
|
Safety/EMI
|
|
|
Options
|
- Data/Fax/Modem (FCC, JATE, CTR21)
- Port adapter
- Car Adapter
|
Physical
Right side
- 1 - Battery pack and level meter
- 2 - CD-ROM/DVD-ROM drive
- 3 - IR port
Left side
- 1 - S-Video connector
- 2 - RJ-45 (LAN) or RJ-11 (Modem) connector
- 3 - PC (PCMIA) 2 slots {e.g. Modem, LAN Card}
- 4 - Floppy Disk drive
- 5 - Volume control
Rear view
- 1 - Kensington Lock Anchor
- 2 - PS/2 Mouse/Keyboard Port
- 3 - Power Connector {18 volts DC}
- 4 - USB Port
- 5 - Serial Port {*}
- 6 - Vent
- 7 - Parallel Port {*}
- 8 - VGA Port
- 9 - Expansion Connector (for optional Port Replicator)
- 10 - Microphone Connector
- 11 - Audio Output Connector {stereo 3.5mm mini-TRS}
* the parallel port is bi-directional, and there are also handshake lines on the RS-232 DB9 serial port that can also be used for informal I/O. The lack of a stereo audio Line-In is a disappointment.
Front view
- Lid catch, vents for speakers.
Virus
09lf.exe [link table]
This is a rather nastly little virus that seems to take bites out of system files, meaning that the system effectively has to be reloaded.
More than one beep
one beep good, more than one beep not good.
This mostly to tell you that something quite vital isn't working. Fault beeps are encoded into shorts and longs, but every manufacturer has their own codes. In the case of the 6120 Notebook it is not as likely that any of the inbuilt system components such as screen or keyboard might become disconnected, as in a desktop system.
Thus I have never heard anything other then a single beep from this one, and I can only guess (hope) that all later MiTAC boards use consistant error codes.
Device Manager Codes
- Error Code 1 This device is not configured correctly (Code 1)
- Error Code 2 Windows could not load the driver for this device because the computer is reporting two bus types (Code 2)
- Error Code 3 The driver for this device may be bad, or your system may be running low on memory or other resources (Code 3)
- Error Code 4 This device is not working properly because one of its drivers may be bad, or your registry may be bad (Code 4)
- Error Code 5 The driver for this device requested a resource that Windows does not know how to handle (Code 5)
- Error Code 6 Another device is using the resources this device needs (Code 6)
- Error Code 7 The drivers for this device need to be reinstalled (Code 7)
- Error Code 8 This device is not working properly because Windows cannot load the file that loads the drivers for the device (Code 8)
- Error Code 9 This device is not working properly because the BIOS in your computer is reporting the resources for the device incorrectly (Code 9)
- Error Code 10 This device is either not present, not working properly, or does not have all the drivers installed (Code 10)
- Error Code 11 Windows stopped responding while attempting to start this device, and therefore will never attempt to start this device again (Code 11)
- Error Code 12 This device cannot find any free resources to use (Code 12)
- Error Code 13 This device is either not present, not working properly, or does not have all the drivers installed (Code 13)
- Error Code 14 This device cannot work properly until you restart your computer (Code 14)
- Error Code 15 This device is causing a resource conflict (Code 15)
- Error Code 16 Windows could not identify all the resources this device uses (Code 16)
- Error Code 17 The driver information file is telling this child device to use a resource that the parent device does not have or recognize (Code 17)
- Error Code 18 The drivers for this device need to be reinstalled (Code 18)
- Error Code 19 Your registry may be bad (Code 19)
- Error Code 20 Windows could not load one of the drivers for this device (Code 20)
- Error Code 21 Windows is removing this device (Code 21)
- Error Code 22 This device is disabled This device is not started. (Code 22)
- Error Code 23 This display adapter is functioning correctly This device is not started. (Code 23)
- Error Code 24 This device is either not present, not working properly, or does not have all the drivers installed (Code 24)
- Error Code 25 Windows is in the process of setting up this device (Code 25)
- Error Code 26 Windows is in the process of setting up this device (Code 26)
- Error Code 27 Windows cant specify the resources for this device (Code 27)
- Error Code 28 The drivers for this device are not installed (Code 28)
- Error Code 29 This device is disabled because the BIOS for the device did not give it any resources (Code 29)
- Error Code 30 This device is using an Interrupt Request IRQ resource that is in use by another device and cannot be shared (Code 30)
- Error Code 31 This device is not working properly because is not working properly (Code 31)
- Error Code 32 Windows cannot install the drivers for this device because it cannot access the drive or network location that has the setup files on it (Code 32)
- Error Code 33 This device isn't responding to its driver (Code 33)
- Error Code 34 Windows cannot determine the settings for this device (Code 34)
- Error Code 35 Your computer's system firmware does not include enough information to properly configure and use this device (Code 35)
- Error Code 36 This device is requesting a PCI interrupt but is configured for an ISA interrupt (Code 36)
- Error Code 37 Windows cannot initialize the device driver for this hardware (Code 37)
- Error Code 38 Windows cannot load the device driver for this hardware because a previous instance of the device driver is still in memory (Code 38)
- Error Code 39 Windows cannot load the device driver for this hardware The driver may be corrupted or missing (Code 39)
- Error Code 40 Windows cannot access this hardware because its service key information in the registry is missing or recorded incorrectly (Code 40)
- Error Code 41 Windows successfully loaded the device driver for this hardware but cannot find the hardware device (Code 41)
- Error Code 42 Windows cannot load the device driver for this hardware because there is a duplicate device already running in the system (Code 42)
- Error Code 43 Windows has stopped this device because it has reported problems (Code 43)
- Error Code 44 An application or service has shut down this hardware device (Code 44)
- Error Code 45 Currently, this hardware device is not connected to the computer (Code 45)
- Error Code 46 Windows cannot gain access to this hardware device because the operating system is in the process of shutting down (Code 46)
- Error Code 47 Windows cannot use this hardware device because it has been prepared for "safe removal", but it has not been removed from the computer (Code 47)
- Error Code 48 The software for this device has been blocked from starting because it is known to have problems with Windows (Code 48)
- Error Code 49 Windows cannot start new hardware devices because the system hive is too large exceeds the Registry Size Limit) (Code 49)
Links to resources
Good download source:
http://download.cnet.com/
Serial tools:
Simtel archive
dsz9705x.zip B 39436 981227 X/Y/Zmodem file transfer, EXE version - 960525
gsz9705.zip B 113703 981227 Graphical version of DSZ X/Y/Zmodem file xfer
uft2.zip B 124926 880924 Unattended file xfer system (uses DSZ)
http://www.xtreefanpage.org/
Download 43kb demo version of X-Tree2. The .EXE alone is quite small and will easily fit on a Recovery floppy disk.
http://en.utilidades-utiles.com/download-winzip-windows-98.php
“v11” for w98 - includes WinZip 15 (XP) WinZip 14.5
WinZip 14.5
WinZip 12.1
WinZip 11.2
WinZip 10.0
WinZip 9.0 SR-1
http://www.winzip.com/wzoldvers.htm
WG111v2 Version 3.3.0 (supports Vista)
Released: Jun 05, 2007.
Supports Windows Vista (32/64 bit)
Win Vista x86/x64 driver version: 6.1283.0207.2007(WHQL certified, Works with Windows Vista)
Win 2000/XP/XP-x64 driver version: 5.1283.0207.2007 (WHQL certified)
Win 98SE/Me driver version: 5.1283.0207.2007
Utility version: 1.0.0.180
http://kb.netgear.com/app/answers/detail/a_id/715
http://kbserver.netgear.com/release_notes/d102948.asp
WG111v2

Release Version 2.0.0 Driver and Utility

   Released: August 22, 2006.

Supports Windows XP, 2000, ME, and 98SE
Windows 2000/XP Driver version 5.1213.6.327
Windows 98SE/ME Driver Version 5.1214.6.504
Utility version 2.0.0.0
This release is not compatible with model WG111 (or with TiVo), your adapter must be WG111v2 for this.
WirelessNetView 1.35
http://majorgeeks.com/WirelessNetView_d6102.html
Author: Nir Sofer
Date: 2010-11-22
Size: 44 KB
License: Freeware
Requires: Win7/Vista/2K/XP
Downloaded: 9651 Times
WirelessNetView is a small utility that runs in the background, and monitor the activity of wireless networks around you. For each detected network, it displays the following information: SSID, Last Signal Quality, Average Signal Quality, Detection Counter, Authentication Algorithm, Cipher Algorithm, MAC Address, RSSI, Channel Frequency, Channel Number, and more.
From: ftp://downloads.netgear.com/files/wg111v2_3_3_0_setup.zip
Size: 5.7 MB (5,968,632 bytes)
MiTAC 6120N
Manufacturer: MiTAC
Hardware: MiTAC 6120N
Software name: Drivers package
File Size: 399.5Mb (418904064 bytes)
Uploaded: 09 Jul 2008
Views: 676
Downloads: 148
System: Windows
Description: 6120N Drivers package
Download MiTAC 6120N Drivers package -
http://driverscollection.com/?file_cid=40114969719854285260f530657
Download direct from MiTAC the 400mb file (for burning onto a CD);
http://www.mitac-europe.com/etsc/6120n.iso
ZDNet / Notebooks / Review -
http://www.zdnet.com.au/high-end-notebooks_p4-120106620.htm
sound-drivers.com -
BRILLIANT list!
also good: computerhope.com
MiNote 6120 http://mitac.mic.com.tw/products/minote/6120/6120.htm
FlexNote 6120 http://www.microflextech.com/products/notebook/mitac/6120.htm
Contact
As always, if you have anything to add or correct that might help others with 6120 troubles, please e-mail me.