Forget your temperature-controlled soldering station.
Early on about the only electric soldering irons you could get were hulking 100 watt-plus monsters like the Berko, fitted with a 'fine' half-inch (1cm) tip. Irons like these were common on electrical production lines and in plumbers toolkits.
Then the Scope appeared. Instead of a heating coil it used a very low voltage transformer, nominally 3.3VAC at 30 amps intermittant, to heat a carbon element that pressed against the back of the unclad copper tip.
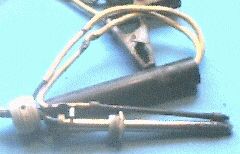
This produced an iron with a very different characteristic. Pressing the slide ring pushed the carbon element forward into contact with the back of the tip, completing the circuit and directly heating the copper tip.
But using a Scope was an art that had to be learned. You learned to pre-heat the iron with one hand while you finished placing the component with the other, doing joints in groups, and knowing when to let go of the ring.
To get the rapid heat-up down to a few seconds the iron actually had a huge amount of power, and if you kept the boot in the whole end would rapidly glow red-hot. I've seen techs use them as lighters.
This huge power reserve came in really handy soldering earth wires to a chassis or large cap lugs, or even pot lugs.
But it was also possible to destroy the tip, badly oxidise and de-tin it, and even melt the cable if you just held it on. The full range of available tips is the snowplough screwed into the end of the barrel.
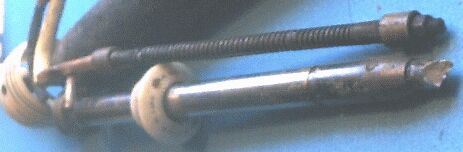
(Observant old hands will notice the small carbon element is actually missing from the end of the center rod)
Modern light-duty irons are fine for PCB's and modern fine assemblies but valve amp joints are normally on bigger lugs that suck more heat from your iron, dropping its temperature until solder won't flow well.
One of the tricks to avoiding cold solder joints is to use a high enough power iron with sufficient heat storage that will rapidly heat the joint to the required temperature without the heat having time to flow to everything else causing damage.
An iron with high AC current flowing through the tip was not suited to solid-state, and the emergence of CMOS was the last nail in the Scope coffin.
My old Scope is dead, but I have a high-power (80 watt) iron to use when required for heavier work. In the end you get a better job than struggling on with a lighter iron.
As far as I know Scope only made a small range of products, the normal Scope, a MiniScope iron, and a spark engraver.
The MiniScope was designed to meet the growing need for a finer iron for PCB work, but the change in design from an actuating ring to a lever that melted was its downfall.
The engraver was similarly basic, a solenoid with a pointed plunger. With the work connected to one side of the transformer the engraver acted like a buzzer on the surface, drawing small arcs which marked the metal. Very Hi-Tech we were in those days.
Adcola's and later Wella's replaced them in workshops in the swing to solid-state.